Sunday, October 31, 2010

Happy Halloween

Forget all those slasher movies. For me, the spirit of Halloween is embodied in Edgar Allen Poe's The Raven and Washington Irving's The Legend of Sleepy Hollow. So this year's layout is all about Poe. Next year I'll have to create something for Sleepy Hollow.

I used this fabby My Mind's Eye Haunted patterned paper Raven and used the front (house) and back (houndstooth check) of  Haunted House. The house, raven and candlestick are flocked.  The spider webs and distressing are nice extra touches.  Additional materials:  Shindig beetle black Doodlebug flocked alphas.  Public domain computer image of Poe.  Tim Holtz Sissix label die cut run through the Cuttlebug with the Tiny Mosaic embossing folder. Red Lead Paperworks Poe collage stamp. Spine and The Raven text page from old book. Martha Stewart daisy fan punch.  Corner punch.
My layout is loosely based on this week's Pages In Time Thursday sketch that was posted on Karen's blog.
And just look at this yummy November Pages In Time monthly kit.   It's chock full of Scarlett Lime goodness from Glitz Design and can be purchased through the Pages In Time site.

Saturday, October 30, 2010

Chunky ATC Swap

The 
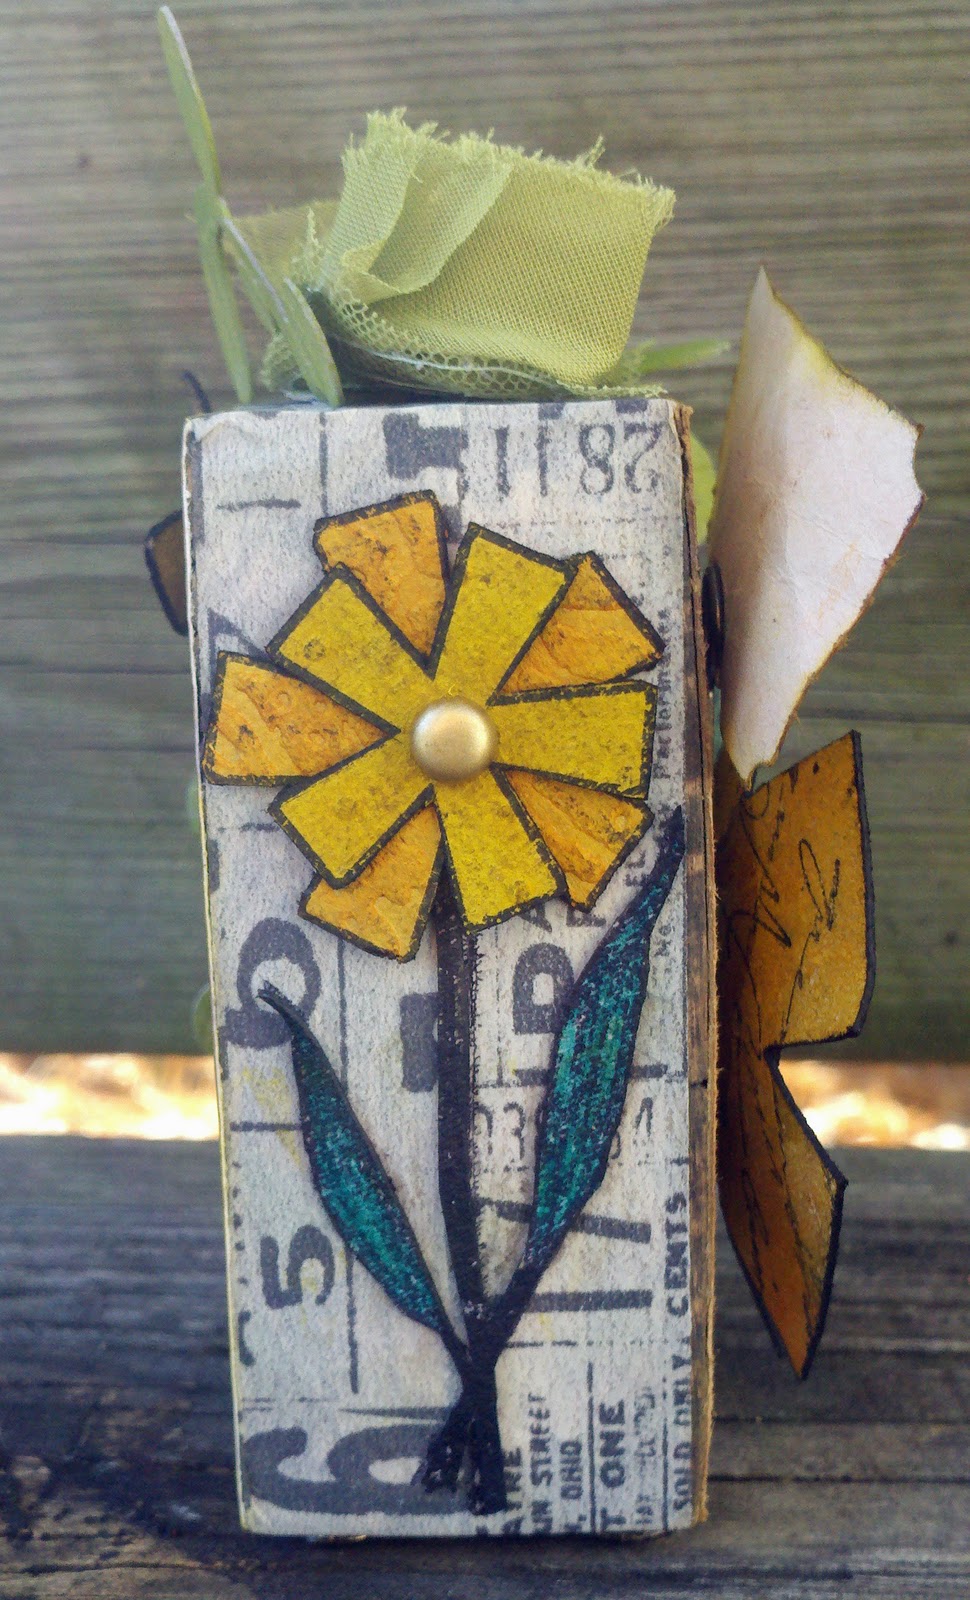
Everything Wendy Vecchi Yahoo! Group just completed a chunky ATC swap.  First I'll show you what I made for Eileen, then I'll show you what I got from Donna.   This was my first attempt at a chunky ATC.  My DH cut for me some ATCs from his woodworking supplies.  They're cut standard ATC size 2-1/2" x 3-1/2" from a 2x4 board.  That makes the sides 1-1/2" wide and gives you 6 sides work with.  Since Wendy has her own stamp line, Studio 490 for Stampers Anonymous, I used those stamps.  Since she also designs for Tim Holtz and uses his products, so did I.  Then I threw in a few things I use to make this from me.  Using tickets and games, my theme is Play (since New York has great plays on Broadway and Eileen--from what I can gather on her blog-- seems to enjoy life, making art and traveling).

For starters:  I primed the entire block of wood with ArtQuest PPA (Perfect Paper Adhesive) Matte.  I used Adirondack Acrylic Paint Dabber in Expresso to distress all of the edges.  Then I layered side by side--all around the four 1-1/2" sides--the two Tim Holtz tissue tapes that came in my package, one with tickets, one with numbers.  I hammered in 4 decorative upholstery nails for feet on the bottom side. 

Here is the front.  I cut a vintage (meaning auction find) BINGO card to ATC size and glued it on the front. I distressed the edges with Tim Holtz for Ranger Antique Linen Distress Ink.  The BINGO markers are inchie size and thick, so I dug around and found the O62 to put on that space at the bottom, hanging over a bit.  The leaf and flower are Wendy's stamps, stamped onto grungepaper, cut out, inked and layered.  The inks are Mustard Seed, Spiced Marmalade, and Pine Needles, all Tim Holtz for Ranger Distress Inks.  I outline everything with black pen. The color palette is from the back side, so maybe I should have shown that first.  The flower center is from a slightly newer, different, yet still vintage BINGO set.  I chose "B" for Eileen's last name.  I wrinkled and distressed the ticket.  Both the ADAGE Ticket and Memo Pin are Tim Holtz Idea-ology.  Of course, grungepaper allows you to mold the leaves and flowers into a 3-D shape.
Here is one of the sides.  You can see the two tissue paper strips.  This is another layered and inked Wendy flower stamped on grungepaper.  I then ran them both through the Cuttlebug, using on the bigger flower the Tim Holtz Alterations Cracked Texture Fade and using on the smaller flower the Cuttlebug Swiss Dots embossing folder.  You can see the 3-D effect of the grungepaper flower from the front.
Here is the other side which has a grungepaper Sissex vine cut with my Cuttlebug rather than by hand as I did the flowers.  Then I ran it through the Cuttlebug a second time using the Bird Call embossing folder.  This vine is painted with Adirondack Acrylic Paint Dabber in Lettuce.  I wrapped the vine (sorta like a beanstalk) up the side and across the top.  Only the stem is glued down.  I didn't take a picture of the top, but I added a Websters Pages bloomer--that and the vintage BINGO card are the me parts.
This is the back and my favorite part of the Chunky ATC. I hope Eileen likes it because I used Tommy Boy, from Paper Imagery Designs, a group she designs for. The ATC background is from Tim Holtz' new paper line.  He cleverly designed paper with a pattern perfect for cutting ATCs and strips.  So this is one of the ATC rectangles from the 12x12 sheet.  I stamped on top of it one of Wendy's number background stamps.  I also stamped on grungepaper Wendy's smaller butterfly and inked it with Vintage Photo and added some vintage Stickles.  Tim Holtz' filmstrip ribbon down the side and Tommy's metal crown complete the ATC. 
Now here is the amazing Chunky ATC I received from Donna.  By the way, these are her photos.  You can tell she's a pro at anything artsy. 
Do you see the face up above?  Isn't Donna amazing? I love that feather! And look at that pleated paper!
I love this bird and rose.  And check out that topper!

Friday, October 29, 2010

GC Creative Connection #2: Only One

It's time again to craft it forward.  Gingersnap Creations has started another creative connection.  This time the challenge is to use only one stamp. 

The words on the stamp I chose are penny for your thoughts.  I'm hoping your thoughts are to participate by completing your own Creative Connection art using only one stamp on your submission.  Just upload it on your own blog with a link to my blog where you first heard about this month’s Creative Connection. Adding this text on your blog post will help to keep the Creative Connection moving in cyberspace:

“I am participating in a GC Creative Connection. I heard about this month’s GCCC - Only One - from {insert artist name here} of {insert referring blog name and link here}. Why not play along? Post a creation to your blog mentioning my post and the Creative Connection post on Gingersnap Creations. Let’s all craft it forward and see how far we can get this connection to go!”
Don't forget to also go to Gingersnap Creations to link up: GC Creative Connections #2
Please note: to participate in this event, your blog post's main focus must be the Creative Connection.

About my card:

I chose a Canadian stamp from a company called Magenta.  The title on the package is Crafty Individuals.  The stamp itself is in the shape of a tag.  I used Archival ink in sepia to stamp it four times.  I cut out parts of the stamped image and colored them in order to create a layered effect with cardboard and foam adhesive.  The ticket portion is distressed with Ranger Spiced Marmalade ink and layered with some grungeboard underneath.  The photo portion is layered on top of the ticket.  I highlighted the words with a Copic, YG03 yellow green.  Some of the tiny letters were painstakingly cut out and adhered with pop dots to make them level with the layers.  I water distressed the edges of some green paper that I had run through the Cuttlebug using a Tim Holtz Checkerboard Alterations Texture Fade. You can't really tell in the photo, but I highlighted the checkers with some Ranger Brushed Corduroy Distress Ink.  I finished with a button and twine.


I'm also using this little creation for Hels' Sunday Stamper challenge: Week #126 green.

Wednesday, October 27, 2010

Who Goes There?


This is the last October goth themed creation for me as a member of the Gingersnap Creations Design Team.   November brings me a whole new theme to work with.  In the meantime, it's your turn to create something for the color challenge GC76: Eggplant, Avocado and Pumpkin. There's plenty of color inspiration on the Gingersnap Creations blog today.  Be sure to link your creation back to GC76.

I started with an unfinished wood frame from Ikea and experimented with some paints.  First I painted it Purple Mist with ArtQuest Perfect Pigment liquid acrylic paint. Then I rubbed in some Spiced Marmalade Ranger Distress Ink followed by another coat of purple paint.  I added some Ranger Distress Crackle Paint in 3 areas for some aging then more paint.  It took a while to get the effect I wanted.  Then after all that, I ended up covering it with my embellishments!!!!!  I embellished with some leftovers from last year's Halloween collection and can't tell you about the manufacturers as the packaging is long gone. But you're looking at a felt glittered bat and Oct 31 as well as an orange glittered cardboard flourish.

The paper is Little Yellow Bicycle Frightful Collection 2008; Party Favors Stretch Skeletons with red eyes made with a Sharpie; Tim Holtz Idea-ology grungeboard: Seasonal Plain for the lantern distressed with Ranger Vintage Photo Distress Ink topped with Green Patina Perfect Pearls.  Inside the lantern, I have a piece of leftover tag that had been distressed with Ranger Mustard Seed.  I added some Ranger Scattered Straw Distress Stickles for a warm glow.  I found the felt glitter spiders at Hobby Lobby this year.  The iron fence is from my newly purchased Martha Stewart punch.  I created a cobweb in the top left corner with some leftover ArtQuest DicroFibers.

This also qualifies for the following challenges:
Dezinaworld Spot Challenge:  Halloween
Tuesday Taggers: Halloween theme plus deep purple 
Tuesday Taggers prize sponsor this week is the Craft Barn

Monday, October 25, 2010

TIME TRAVEL: the key to adventure--Steampunk style


This week Karen, from Pages In Time, gave us a fabby sketch from Suepup to work with.  As a Pages In Time Design Team member, it's my turn this week for creating a layout from the Thursday sketch for October 21.

I decided to use the Graphic 45 Steampunk Debutante papers along with some Websters Pages ribbon trim and a bloomer. I also added a Tim Holtz Idea-ology word stick and got to use the Martha Stewart iron fence punch..  This layout is loaded with layers of cardboard and foam dots in order to create dimension for all of my fussy cutting. I also cut out one of the plastic domes from packaging and placed it on top of the watch face, adding Rock Candy distress stickles for a broken glass effect.

This layout also qualifies for this week's SoArtful challenge:  key

NOTE:  I'm entering this layout in Sandy Ang's Challenge #2 Victorian Fantasy.  I chose the Steampunk prompt.

Wednesday, October 20, 2010

Pages In Time ATC SWAP: Fall Fantasy

I'm hosting a couple of ATC swaps in the Tags and Things group at Pages In Time.  Our Fall Fantasy swap is closed and I'm about to swap out all of the ATCs sitting here at my house and get them in the mail to the participants.  We had three categories to choose from:  Halloween, Twilight (the movie), and Fairies.  Some crafters made ATCs for more than one category.

I personally chose to make 3 identical Halloween ATCs.  I used this collage stamp from Red Lead Paperworks in St. Louis, MO. (Check my sidebar for a link to our Red Lead Swap Sisters Art Blog where my Halloween tags are on display!)

I stamped Poe twice so that I could layer his photo with pop dots. I covered this part with Distress Rock Candy Crackle Paint so that it looked like the glass over his portrait was cracked. I used a color duster to brush some Spiced Marmalade Distress Ink over the text. distressed the right edge so that it looked more like an old hymnal book. I added a sparkly spider on top of the web. I was looking for some spiders that were more appropriate to the theme, but by the time I got to the stores one hour away from me, this was all I could find.  I should have bought those cute metal ones when I was at Red Lead!  Live and learn. 
Back to Pages In Time, we have a Holiday ATC swap going on in the Tags and Things group. Sign-ups are still open. The swap is 5 for 5 of any holiday theme celebrated in November and December. Won't you join us? There's a link on my sidebar for Pages in Time.

Monday, October 18, 2010

Simple Doily Card

Deb is hosting challenges now on her blog, Simple Treasures
She also has some blog candy.  You can see a photo of it in my Candy Jar on my sidebar.
This is my card for her first challenge which expires tomorrow.  So you need to get something made and posted soon!  And sign up for that blog candy!

I'm also posting this for the Lots to Do challenge this week which is Plain and Simple.  This was a simple card to make and would be a great project if you need several cards in a hurry.
Her challenge was based on this lovely Martha Stewart photo:
I looked at the round tin and realized I had bought some circle cards.  I ran one though the Cuttlebug using the Divine Swirl embossing folder.  Then I opened up the Spellbinders Shapeabilities Pendants package holding Renaissance Hearts that I purchased a while back but had never used.  I layered 2 of the shapes and added a bow.  It reminds me of a holiday ornament and probably could be used for a banner or tree decorations.

Thanks Deb, for this great challenge.  You got me using a product sitting idle in my desk drawer, and you gave me an idea for some holiday cards!

YUM: Pumpkin Bread


This is a family favorite which I always make for Thanksgiving.  It's never served as dessert.  Rather, the kids grab a slice for a late night snack or breakfast. Now the recipe will be handy since the layout will be displayed on an easel in my kitchen.  And yes, that's a picture of the cake sitting on my kitchen table.

I used the Bo Bunny Olivia papers and cutouts that came in the October Pages In Time kit.  Many hours were spent this weekend fussy cutting from the patterned papers all of the leaves for vines and the flowers. I added a TPC Studio Rustic Garden pumpkin die cut for the background mat.  I cut out the boy and girl from some Crafty Secrets Halloween images.  Additional flowers are Prima and a Websters Pages bloomer.  Flower centers are Stickles in Scattered Straw or Holly.

I'm submitting this to  
Simply Scrapping Crafts for the Sketchy Saturday October Week 2 sketch. 

Dezinaworld: feminine plus masculine spot challenge  I have both a boy and a girl from Crafty Secrets on my layout
The Shabby Tea Room:  Week #32 Chocolate Covered Autumn:  be inspired by the photo:  I was inspired by the fall colors and the cake

Friday, October 15, 2010

Gingertivity

We Ginger newbies on the Design Team have our ginger themed creations featured on today's post at Gingersnap Creations.

Expressing our gingertivity as Official Gingers are Penny, Petra, Jules, Stephanie and myself (Helene).


I offered up my Genuine Ginger album page as I think it best represents my gingerness.

Tuesday, October 12, 2010

Puttin' On the Ritz

This 4x6" tag postcard uses VersaMark which is our Gingersnap Creations GC74 Spicy Supply challenge for Goth-tober.  Here's the link to the post so that you can read all about it and join in the fun: GC74

I heat embossed the skeletons by using this technique: stamp image with VersaMark to create a translucent image. Sprinkle image with Ranger Seafoam White embossing powder and shake off excess. Use heat gun to melt powder until image is shiny and raised.

To make this look like a stage for my dancing duo, I used clear gems, Tim Holtz tissue tape, and puffy silver star trim. Do they look like they're dancing their hearts out for their audience? (We won't talk about all those bones under the stage!)

I used stamps from Red Lead Paperworks because this tag is going to a Red Lead Swap Sister.

Monday, October 11, 2010

You Are My Sunshine


As Design Team member of Pages In Time, I love to create a layout from the weekly sketch.  I used the beautiful papers from the October kit.
This month's Pages In Time October Kit has Bo Bunny Olivia paper from their new line, A Gift of Love, along with Bo Bunny Rub-ons, Prima lace, some small flowers and a small Bo Bunny Decorative tab.
I added some additional Prima flowers and bling brads, along with a couple of Petaloo flowers and some stamping.
 The Pages In Time Thursday sketch for October 7 is:
What would you like to create from this wonderful sketch?  Won't you join us at Pages In Time?

Saturday, October 9, 2010

A Vintage Halloween


Did you hear something?
This is a 4 x 6 postcard tag made for a Red Lead Sister Swap and a few on-line challenges. Click on the titles of each for direct links to the sites where you can enter too!  Also, all sites have direct link badges posted in my sidebar. 

The Shabby Tea Room:  vintage Halloween

Pages In Time: DTer Lacee's October mini style challenge in her You've Got Style Baby group:  pick a style and make your art piece no bigger than 8 x 8"

Simon Says Stamp and Show:  Your Numbers

Creative Spirit Challenge:  October  (Cindy's challenges are wide open regarding the theme and entries can even be previous posts.)

Materials:
from Red Lead Paperworks:  4x6 postcard tag,  digital image of girl, sentiment from their Story Stamps A Halloween Tonic Story stamp set

patterned paper from Memory Box Blackbird stack pack
BINGO card cut from cardboard insert of Jenni Bowlin Halloween BINGO cards set

from my stash:
ribbon:  Offray: black
Colorbox liquid chalk black ink
Archival Ink: jet black

Autumn Birthday Card


So Artful: Fall Is In the Air
Pages In Time: DTer Marie's Challenge: brown and orange autumn card
Everything Wendy Vecchi Yahoo Group: Birthday card club

Studio 490 stamp: leaf stamped on top of inked up tagboard (Ranger Distress Inks) and then cut out and coated with Distress Stickles in either Scattered Straw or Frayed Burlap.

Computer generated quote, printed on vellum; Spellbinders Nestabilities Labels 1.
MemoryBox Blackbird: patterned paper.
Kaiser gems

Sunday, October 3, 2010

A Vintage Bookmark

Pages In Time: October Challenges:
1) Design Team Member Lacee's October Challenge: Victorian Style using the image given, including lace, pearls and these colors: pale pink, brown, creme and burgundy
2) My Tags & Things Group bookmark mingle to make 2 vintage style bookmarks

The Shabby Tea Room Week 29:  Pastels and Pearls

The Sunday Stamper Week 123:  String  (including pearls)  Minimal stamping this time around, using Stampin' Up stamps.

Lots To Do: vintage

I minimized the darker colors to just the tiny flowers in the MemoryBox Blackbird mini stack patterned paper and the Ranger Distressed Ink edging--so that I could concentrate on the pastels.  I also picked up the green in the woman's dress by adding a green Websters Pages bloomer which I think is perfect for a bookmark.

GOTH-TOBER at Gingersnap Creations

As a new Ginger at Gingersnap Creations, my first Design Team art is "Going Goth" this month with eerie elements and spooky supplies. The group also will be concentrating on weathering and crackling techniques. Challenges are posted weekly with plenty of time to get them done and linked from your blog to GC.  Even better, you may combine GC challenges with others.  Won't you join us?  Here's the link:  Gingersnap Creations

GC also has a Yahoo Group where additional activities take place.  This month's art exchange is (click on title to learn all about it) GC Art Exchange#5 Winter Themed 4x4's. Sign ups just started and the art is due November 15.  Come play with us!

We just completed the scraplings art exchange.  Remember my post of the ones I made to exchange?

These are the ones that arrived in my mailbox yesterday...
 I love how each artist has such a unique style and take on this challenge.  My art exchange is from Shar, Ali, Krisha, Vicki, and Paula. 

World Cardmaking Day

I was busy making cards Saturday since it was World Cardmaking Day.

Both of these cards were started at my Prairie Stampers Club on Monday.  Our activity was provided by one of the members who's a Stampin' Up demonstrator.  We used lots of punches.  And we used bubble wrap to make card backgrounds.


On this card, I used an oval punch and  round punch.  The punching and stamping was as far as I got with this one during the meeting.  The pumpkins are made by layering 3 ovals or 3 circles.  I inked the edges for more definition and added some vine ribbon trim for the stems.  The faces are from a SU stamp set.  Aren't those little bats from a SU punch just the cutest things ever? Instead of using my black paper decorated with silver bubble wrap circles, I decided on this patterned paper from my Memory Box Blackbird stack pack.

This second card actually was made during the Stampers meeting.  I have to say that because I seldom complete a project during the meeting.  I usually have to finish it when I get home.  First we created card backgrounds by inking up some bubble wrap.  An SU stamp created the "seaweed".  The circle punches are obvious.  The fish is made with an ornament punch, heart punch, and a five petal flower punch.  How clever is this? (idea from the SU demonstrator, not me!)  I added a little dimension by using pop dots for the 3 bubbles and one fin. 
I'll post more cards later this weekend.

Blog Archive

Family Heritage Album