Friday, July 29, 2016

Another birthday card

Have you heard of the one sheet wonder?  You stamp a backgound on a piece of paper, then cut it up to use as mats to make several cards.  A link to just one version of this technique is HERE  (We worked on this technique, assembling our cards at our card play day yesterday.)

Because I was using a particular inking technique for a journal spread, I decided while I had the ink out, I'd also do a background for this one sheet wonder.  I tried added more stamps in addition to the script stamp but thought it looked too cluttered.  I saved that for the journal pages.


Materials:
Ranger Distress Inks:  Brushed Corduroy, Faded Jeans, Broken China, Vintage Photo
Archival Ink Jet Black ink
Stampin' Up very vanilla cardstock
Core'dinations Kraft A2 cards
shimmery aqua blue cardstock from stash
STAMPlorations Born to Roam clear stamp set

My blog post title says "birthday card"  Yes, the birthday sentiment is on the inside.  I was in a hurry to get this card in the mail and managed only to get a photo of the card front.


Entering these challenges:

Lunagirl Moonbeams July Challenge: Trains, Planes and Automobiles I'm #15 x


STAMPlorations July CASEplorations challenge  I'm #16 x

Tuesday, July 26, 2016

GDT: Camper Scrapbook Page

This is my second July post as Guest Designer for Imagine That! Digis by Kris.  Her blog is HERE. Please visit to see other design team makes and current challenges.

A couple of weeks ago, my sister and her husband visited us for a week.  They brought with them their small Airstream Bambi travel trailer.  My four year old granddaughter and her younger brother paid them a visit to see the inside of the camper up close and personal.  She now owns the Barbie Airstream!!!!

You know what's coming next, right?  I had to make a scrapbook page of their visit.   I love that Kris gives us both precolored digis as well as outlines that we can color to suit our needs.


I used 
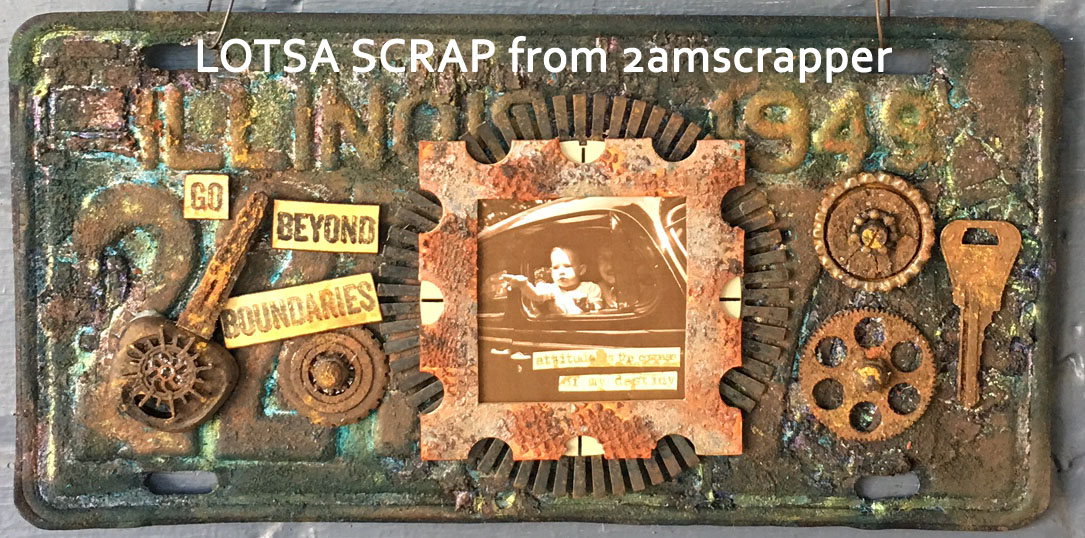
a lot of really old stuff in my stash to make these pages.

Starting with two pieces of 12x12" blue paper, I used a brayer to apply wet Ranger distress ink in broken china and salty ocean.  Then I sprayed on some Ranger distress spray stain in picket fence and dabbed with a sponge.

I ripped strips of asparagus Coredinations cardstock, ran them through the Big Shot with the Provo Craft bird call embossing folder, and sanded the raised embossed grass

Other Materials:
Provo Craft the Third Dimension Stand Outs: shaker sun wood embellishment
Fiskars Heidi Grace Chipboard Shapes Baby Boy
Twine
Burlap
Various bits and bobs for embellishments
Foam adhesive, Scor Tape and FinnabairArt Basics Heavy Body Gel
Black Sharpie
Hand Made Modern Satin acrylic paint: leaf

I used The Great Outdoors Kit which you can find in the store
http://www.imaginethatdigistamp.com/
HERE


I colored the boy and girl with Copic markers, but printed out the pre-colored camper so that I could use the matching paper for my digital photos mini composition.  (I used the marshmallow for my journaling spot!)

The flags ae made with triangles of variouis patterned papers from Argyles and Plaids Digi Papers set found in the store HERE.


I have to tell you I was sitting at the art table with my granddaughter and was trying to decide if I should use large or small pennants when she suggested "making a pattern" ---so I did, alternating large and small.  So smart!

Entering These Challenges:

ABC Challenge: July 15 L is for Lots of Layers I'm #108 x

Classic Design Team Open Challenge July I'm #174 x

Southern Ridge Trading Co July: Anything Summer I'm #29 x

Stick It Down July Double Page Sketch  I'm #19 in a mix of 3 different challenges x


Til next time, I'll be crafting a lot in my little land of Scrap A Lot.


Monday, July 25, 2016

Finn Workshops

I am so lucky to have the opportunity to see Anna Dubrowska aka Finnabair in person.  This is the second summer I was able to take her workshops and this time I took all three!

Workshops were held at the Paper Boutique in Springfield IL.  Independent scrapbook stores are a rare commodity these days.  Here, again, I'm lucky to have one nearby.  And lucky the store was able to host Finn.  The group photos and my clock in its early stages were taken by the Paper Boutique staff.  A thank you to them for letting me repost the photos from their FaceBook page.

First workshop was the verdigris canvas.  I used a spoon for my focal point.


Look at how serious we all are as we gather around Finn to learn the first steps. Note the blank canvas that we are about to transform....


And here's the group posing with their finished canvases. I'm the the royal blue shirt and black apron. A bonus for me was getting to sit next to my friend in art, Linda Cain, who is on Finn's design team.


The next day I was back for more.  This time I sat with my crafting friends from the store, Terrie and Joanne.  

The morning project was transforming a Prima clock into a work of art. This is a photo of my work station taken by the Paper Boutique.


 I used colors that matched my living room palette.


The afternoon brought us to the rust workshop.  Most people transformed a book cover.  Being an overachiever, I brought a wood cigar box to alter.  Not thinking things through, that meant I had more surfaces to cover and dry in the allotted time.  But I loved working with these rust effect products.


The objective was to make this look old as if found in the bottom of the lake--or I'd say a musty attic or damp basement.  A bit of unfortune for me was something leaked on the photo.  It didn't seep through until the next day. (I'm assuming I didn't dry something thoroughly before moving on to the next step!) However,  that makes it look like it definitely was found on the bottom of the lake!


And the final group pic of the day! I'm on the end on the right and realize I should have taken off my black apron!


I didn't get a photo with Finn because I had one from last summer:


But I wish I had asked her to autograph my copy of the Somerset Magazine cover featuring her art.


Next time!


Friday, July 22, 2016

Birthday Card for a Musician

Here is a masculine birthday card for a musician in the family.


This card is 5-1/2 x 6" because I wanted to use Shery's enter cupcake border and still have room for the bigger single cupcake.  I love the sketchy look of Shery's images and thought blueprint ink would be a perfect pairing.  After stamping, I outlined all the papers with the same ink.

I didn't have any blue background paper to match the blueprint ink, so I created my own using a music stamp and water mist.  I chose music since it's in the border stamp.  I was surprised at how purple the blueprint ink base was--I even checked the bottom of the ink pad to make sure I had grabbed the right one. You can see where I spritzed water--the ink turned into a purple/red color.


Once I saw the color base, I went to my purple paper stash. There I found translucent Iris from the Paper Company.  It was a perfect match and added the needed mats for a finished look.  Now it truly looked like a blueprint!

Materials:
STAMPlorations Sketched: Cupcake
STAMPlorations Cupcake Row Artsy Border by Shery Russ
Stampin' Up Very Vanilla paper
The Paper Company translucent Iris speciality paper
word from birthday embossing folder
Tim Holtz Ranger blue print distress ink
Rogue Redhead Designs LLC music background stamp
water mister bottle for spritzing
Ranger blending tool

Entering:

STAMPlorations July Sketch challenge I'm #31 x


Double "D" Challenges:  Shades of Purple  I'm #34 x

Sunday, July 17, 2016

National Ice Cream Day!

National Ice Cream Day!

The humidity/heat index was 107 degrees today.  Time to cool off with ice cream.  I got a caramel coffee shake from the local spot two blocks from my house--dangerously too close to me!!!  You can tell it's sweating, just like me!  The whipped cream melted before I could get my photo shoot done.

A GDT extra for  Imagine That! Digis by Kris.


You can find the ice cream treats outline digi as a freebie at the FaceBook friends and fan group HERE.

Join our FB GROUP!

I combined it with some of the Ice Cream Parlour Papers.


The digi pack can be found in the store HERE,  While there, look for more freebies. 

This is what I did with the free digi cone:
1) digitally colored the top of the cone in two shades of brown to match the digi paper;
2) copped the brown plaid paper and angled it to match the cone cross hatch grid, printed, and cut it to fit the cone;
3) added some sprinkles on top of the ice cream, 
4) cut the cone into 4 pieces and outlined each with black marker, then placed on the digi paper with foam tape;
5) printed one of the sayings and added it to the cone with more foam tape

Keep cool!


Wednesday, July 13, 2016

Summertime Fun

An extra for my GDT with Imagine That! digis by Kris.  Check out the July Summertime Fun challenge on the FaceBook page HERE

This is a totally digital 6x8 inch scrapbook page for my grandkids' scrapbook.  Since my granddaughter has dark hair and loves the color pink, how perfect is this pre-colored pool girl?


I started with the Summer Fun digital paper pack and set up my background. I added waves from the My Sailmate set.  I finished with pre-colored images from the Pool Girl set.  (I use PhotoShopElements software for digital layering and shadowing.)

I love that there's an invitation card included in the Pool Girl set.  I used it as a journal card when I scrapped my granddaughter's birthday party pics opposite this scrappy page.

Please visit the store for all the digis.
http://www.imaginethatdigistamp.com/

You can find Pool Girl in the store HERE


You can find Summer Fun Digi Paper in the store HERE


You can find My Sailmate in the store HERE


Entering this challenge:

Digitally Sweet Challenges:  #152 Optional: Anything Goes if Totally Digital  I'm #13
I'm mid-challenge featured!!!!!

And then.....


Til next time, I'll be crafting a lot in my little land of Scrap A Lot,


Tuesday, July 12, 2016

GDT for Imagine That! Digis by Kris

I've accepted a guest designer spot for the next 3 months at Imagine That! Digis by Kris A link to her main blog is HERE.  Be sure to visit to see what the other designers are making with Kris' digis and to see the current challenges.

You'll be seeing posts from me on the second and fourth Tuesdays of the month featuring Kris' adorable digital images.

So let's get to it, shall we?


I used a pre-cut and folded step card.  Using Nautical digi papers, I resized them to fit on the card, printed out the papers, and adhered them to the card.  I resized so that the pattern would remain true. I used the scor-pal to rescore the "steps" after addin the various papers.


I chose, resized and printed out images from My Sailmate.  Because of my nautical theme, I chose to color with watercolor pencils.  I used my Stampin' Up set and my new Prima Julie Nutting Watercolor Pencils in Hair and Skin Tones.


After fussy cutting the images, I adhered them to the card with various thicknesses of foam adhesive. I put wind in the sails by shaping them as you would flower petals.

If you like challenges, please learn more about the Fancy Folds / Shaped Cards current challenge at the Creative Playground HERE.   The challenge runs until August 5.

Monthly Challenge

On FaceBook?  Check out the friends and fan group HERE. There are more challenges and some freebies for the FB members.

Join our FB GROUP!

Shop the digis HERE,  You'll find some freebies here too.

Shop Our Digis!

Your turn now.  Try out some digis and enter some challenges!

I'm entering this in these challenges:

Digitally Sweet Challenge #152 Travel  partially digital I'm #14

Classic Design Team Open Challenge July Anything Goes I'm #160


Scor-Pal   Fun in the Summer Sun and More Than One Score Tell where to score:  it's a standard step card with the steps in the middle, need to cut then score the steps

Blog Archive

Family Heritage Album